How to Install WordPress in Hostinger | Hostinger Tutorial 2024
Tutorial Hosting
Introduction: Installing WordPress on Your Hosting Website
Welcome, ladies and gentlemen, to our step-by-step tutorial on how to install WordPress on your hosting website. In this guide, we will walk you through the process of setting up WordPress on your website so that you can begin creating and managing your own content with ease.
Step 1: Accessing Your H Panel
To begin, you will need to access your hosting panel, also known as the H Panel. This is where you can manage all aspects of your website, including installing WordPress. Navigate to the top of the page and look for the “Websites” section.
From the H Panel dashboard, locate the website you would like to add WordPress to and click on the “Manage” button. This will take you to a menu on the left-hand side, where you can find the “Website” option. Click on “Autoinstaller” to proceed.
Step 2: Selecting WordPress Autoinstaller
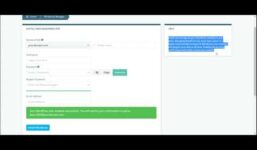
Once you have accessed the Autoinstaller section, you will see an option for an optimized WordPress web builder. Click on “Select” to begin the installation process. You will then be prompted to enter some details for your WordPress website.
Provide a title for your website, along with an administrator email, username, and password. These details are essential for accessing and managing your WordPress site. Once you have filled in the necessary information, click on “Next” to proceed.
Step 3: Configuring Installation Settings
In this step, you can choose to customize a few installation settings. You can leave the application version as is and adjust your language preference if needed. Additionally, you can select to update only to minor versions to keep your WordPress site up to date.
Once you have reviewed the settings, click on the “Install” button to begin the installation process. Please note that installing WordPress will overwrite any existing files on your website, so it is important to back up your data to prevent any loss of information.
Step 4: Completing the Installation
After confirming the installation, you will see a notification that WordPress has been successfully installed on your website. You can continue to customize your site by installing an SSL certificate for added security.
Additionally, you may be presented with suggested plugins that can enhance the functionality of your WordPress site. Feel free to explore these options and install any plugins that you find useful for your website.
Conclusion: Finalizing the Installation
Congratulations! You have successfully installed WordPress on your hosting website. By following these steps, you can now begin creating and managing your content with the user-friendly WordPress platform.
If you found this tutorial helpful, please consider giving us a like and subscribe for more informative guides. Thank you for watching, and we look forward to helping you with your WordPress journey. Peace.